Showing posts with label Tutorial. Show all posts

Feb 11, 2011

Homemade Laundry Soap

Making laundry soap is something I've wanted to do for quite some time.  It is economical and produces less consumer waste.  No more buying big plastic containers of laundry detergent anymore!  My 3 year old had fun helping me mix up the soap.   I tested the soap in cold water.  Keeping my fingers crossed, just in case, I pulled each piece of clothing out of the washer for inspection.  The results were spectacular!  I’m sure you are thinking there is no way this is better than store bought detergent.  I thought this also when I first read about it.  The more I read about using homemade laundry soap on blogs and reading all of the comments others had on this subject made me wonder if it would be comparable to mine.  I am happy to say it is!  My clothes all came out perfectly clean.  Want to make your own?  Here is how.

~ Supplies ~
1 Bar of soap (I used Fels Naptha Soap, but you could use Ivory)
1 Cup of Arm & Hammer Super Washing Soda
1 Cup of Borax
Grater
Food processor (optional)
Container to storage soap in


Grate the bar of soap.  If you are not planning on using a food processor to mix this all together then grate the soap as fine as you can.  Be careful, don't cut any fingers.


Add the grated soap, 1 cup of washing soda and 1 cup borax to your food processor. 


The soap will not get as fine as the washing soda or borax.  That's okay.  It should look something like this.


Put your soap in a container that will seal tight.  I put mine in a quart mason jar.  Well, my son did it for me :-)

That's it.  Super easy to make!  Use 1-2 tablespoons per load.  I am always washing full loads, so I use 2T. Sprinkle the soap into the water as it is filling up, then put in your clothes.


Let me know if you make it.  I would love to know :-)
P.S - Another laundry tip, which I've been using for a few years now, use white vinegar as a fabric softener.  I noticed a few years ago that my clothes were always making me a bit itchy so I stopped using fabric softener and started using vinegar.  The vinegar does a fantastic job breaking down any remaining soap during the rinse cycle.  I believe that is what was causing my itchiness, soap residue on my clothes.  And no your clothes will not smell like vinegar.  Vinegar is a natural deodorizer and disinfectant.  I have been using vinegar to clean for years.

Feb 6, 2011

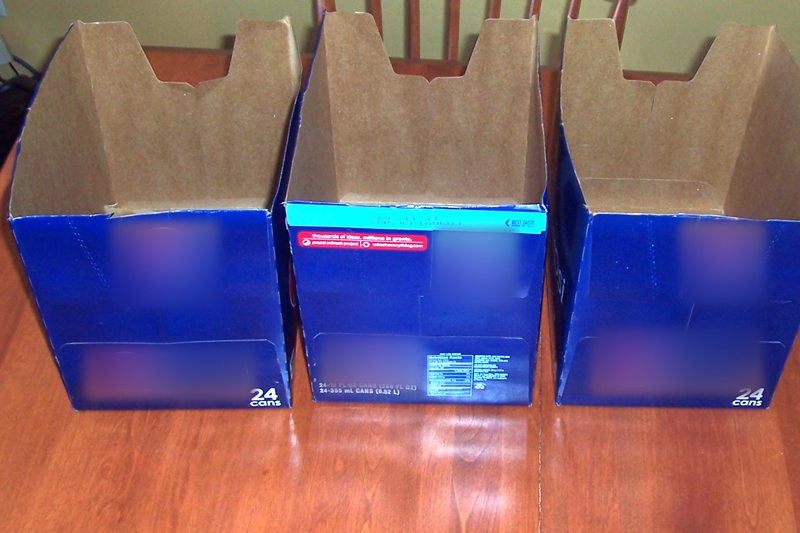
Tutorial For Storage Box From Soda Case

Have you ever been in need of storage, but didn’t have the extra money at that moment to run out and buy something?  This project will most likely cost you nothing, like it did me!

Supplies needed
Empty case of soda
Wrapping paper or fabric
Invisible tape or glue (if using fabric)
Scissors

1) Cut the top off of your box.
      
 2) Lay your box on top of your paper/fabric to determine where to cut. 


Make sure the length will wrap all the way around the box plus an extra 1”. 
Add enough paper/fabric for 1-2” on the bottom.
Add about 6” to fold over the top.  Less if your box does not have a hole like this.

3) Since I am making more than 1 box, I am cutting my paper in half.  I folded it in half (after making sure I would have enough for each box) then cut along the fold line.


4) When you put your edge at a corner vs the middle your project will appear seamless.  I find it is easier to fold my paper (or iron my fabric) under 1” then line it up to a corner.    
Hold the folded edge to your corner.
Wrap the remaining paper/fabric around your box.
Tape (glue if using fabric) the opposite end to your box.
Tape/glue the neatly folded edge on top at the corner. Tape the entire side of the box.


5) Bottom of box
Cut small triangle out of each corner.  This will make it less bulky underneath.

Fold up your first edge.  
Place one piece of tape in the middle of the paper to hold it to the box.
Go to the opposite side and do the same.
Then do the other two sides.
Once all four sides have been taped down, add a piece of tape at each corner.


 6) Top of box
Do the same as the bottom, except put tape/glue along the whole edge.

There you go, a free box to storage things in that looks nice.  I made four boxes and placed them on the top shelf in my daughter's room for out of season clothes.

Dec 22, 2010

Teacher's Love Gifts Too


Mya headed off to school this morning proudly carrying this gift all wrapped up with a pretty red ribbon. I started this project in Photoshop. Once I created all of the pieces I disected it to print. I printed the base papers as one image. The rest of the pieces where cut printed then cut out then assembled back on top of the base. Below is the layout I create for printing out this hybrid project. A hybrid project is something that is created digitally, but then printed, cut and glue in a traditional scrapbook/card making way.  If you have the ability, always save it as a PDF so the images won't accidentally get reduce because of margin issues!  Note to self - stop making tiny things to cut out :-)  The toughest item to cut out was the "read and learn" image.  The hardest thing to glue and place were the letters, since I couldn't find my bead tweezers.  I used them to make daughter's flowers at Halloween.  Now if I could only figure out where I put them.


Posted by Picasa

Nov 27, 2010

Transform tins for creative gift giving this year! (picture is linked to tutorial)
Turn leftover holiday tins into practical containers to store craft supplies, receipts, loose change, you name it.
Related Posts Plugin for WordPress, Blogger...