Feb 16, 2011

Fabric Or Chocolate, I Pick Fabric!

If I had to pick between fabric and chocolate, I would most defiantly pick FABRIC!!  The beautiful colors, the endless projects that could be made out of it.  The one thing I wish I had more of?  Fabric stores close by that sell designer fabrics.  


Online shopping is an option, but most store make you buy fabric by the yard.  At $8-$10 per yard, that can really take a bite out of your wallet.  For big projects it's okay because you normally would buy a large amount anyway, but what if you are a quilter or want to make a small project?  


I found a AWESOME store online that not only sells wonderful designer fabrics at a great price, but they will sell you fabric starting at 1/8 of a yard!!!.  It's like a dream come true :-D


Hawthorne Threads Logo Image


Hawthorne Threads not only will sell you 1/8 yard but they also have great prices on their fabrics and their shipping prices rock.  You must check them out!!

Feb 13, 2011

This Weekend

Saturday afternoon my dear 6 year old and I ventured to our local fabric store, Verna's Fabrics in Mifflinburg, PA.  As soon as we walked through the door the owner started talking to my daughter.  She asked if she starting sewing yet then took a few 6" squares out of a bag full of scraps to show her.  She showed my daughter how we could cut the squares into smaller squares so she could make a quilt or pillow for her baby dolls.  My daughter had a smile on her face from ear to ear.  She then proceeded to give her the whole bag of fabrics!  
Verna, thank you so much for giving my daughter the inspiration to start sewing.!!  Your generosity was such pleasant surprise.  You are a wonderful woman.


This morning we went through all of the fabrics.  I asked her what she wanted to make first.  Her answer?  A quilt for one of her baby dolls.  She picked out the fabrics and I cut them into 2 1/2" squares.  She has hand sewn one row together so far.  I told her to take her time and work on it here and there.  I'll post her progress as she sews her first project, a baby doll quilt!  I'm such a proud mama!!
The reason for our trip to Verna's on Saturday was to buy fabric for a table runner I want to make for our dinning room table.  This is what we came home with.
Most of them are Moda Fabrics, which is one of my favorite fabric companies.  I am going to use this tutorial for my table runner.  This piece of Moda will be used for the backing. 

____________________________________________
Valentine's day is just around the corner.  Tonight we printed, cut, and addressed these cute little valentine's for my daughter's 1st grade class.
The kids put 20 heart candies in snack bags while I stapled them to the envelopes.  I think they ate 1 for every 3 they put in the bags :-)

Menu For The Week

What's for dinner this week?  Steak on Valentine's Day, since hubby loves steak!  The kids are excited about making individual personalized pizzas this Friday.  And Sunday we are having a big chicken dinner.


Our menu this week.....


~ Linking up to ~ 


Feb 11, 2011

Homemade Laundry Soap

Making laundry soap is something I've wanted to do for quite some time.  It is economical and produces less consumer waste.  No more buying big plastic containers of laundry detergent anymore!  My 3 year old had fun helping me mix up the soap.   I tested the soap in cold water.  Keeping my fingers crossed, just in case, I pulled each piece of clothing out of the washer for inspection.  The results were spectacular!  I’m sure you are thinking there is no way this is better than store bought detergent.  I thought this also when I first read about it.  The more I read about using homemade laundry soap on blogs and reading all of the comments others had on this subject made me wonder if it would be comparable to mine.  I am happy to say it is!  My clothes all came out perfectly clean.  Want to make your own?  Here is how.

~ Supplies ~
1 Bar of soap (I used Fels Naptha Soap, but you could use Ivory)
1 Cup of Arm & Hammer Super Washing Soda
1 Cup of Borax
Grater
Food processor (optional)
Container to storage soap in


Grate the bar of soap.  If you are not planning on using a food processor to mix this all together then grate the soap as fine as you can.  Be careful, don't cut any fingers.


Add the grated soap, 1 cup of washing soda and 1 cup borax to your food processor. 


The soap will not get as fine as the washing soda or borax.  That's okay.  It should look something like this.


Put your soap in a container that will seal tight.  I put mine in a quart mason jar.  Well, my son did it for me :-)

That's it.  Super easy to make!  Use 1-2 tablespoons per load.  I am always washing full loads, so I use 2T. Sprinkle the soap into the water as it is filling up, then put in your clothes.


Let me know if you make it.  I would love to know :-)
P.S - Another laundry tip, which I've been using for a few years now, use white vinegar as a fabric softener.  I noticed a few years ago that my clothes were always making me a bit itchy so I stopped using fabric softener and started using vinegar.  The vinegar does a fantastic job breaking down any remaining soap during the rinse cycle.  I believe that is what was causing my itchiness, soap residue on my clothes.  And no your clothes will not smell like vinegar.  Vinegar is a natural deodorizer and disinfectant.  I have been using vinegar to clean for years.

Feb 6, 2011

Tutorial For Storage Box From Soda Case

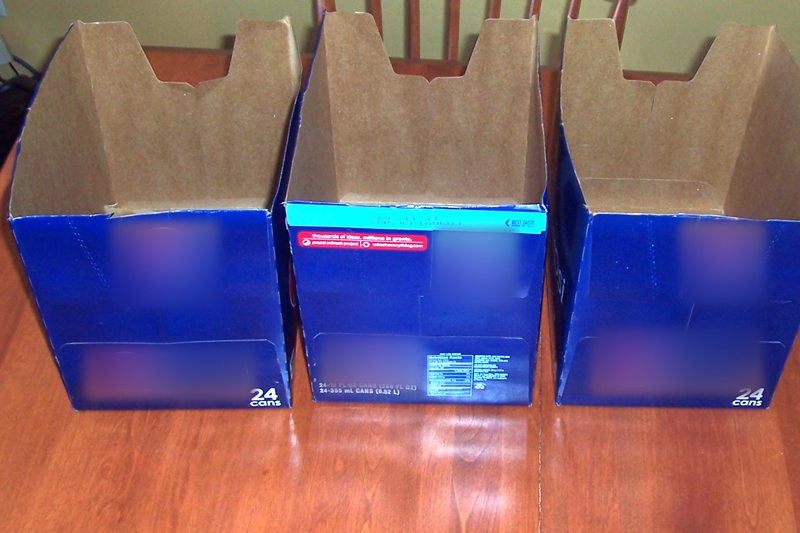
Have you ever been in need of storage, but didn’t have the extra money at that moment to run out and buy something?  This project will most likely cost you nothing, like it did me!

Supplies needed
Empty case of soda
Wrapping paper or fabric
Invisible tape or glue (if using fabric)
Scissors

1) Cut the top off of your box.
      
 2) Lay your box on top of your paper/fabric to determine where to cut. 


Make sure the length will wrap all the way around the box plus an extra 1”. 
Add enough paper/fabric for 1-2” on the bottom.
Add about 6” to fold over the top.  Less if your box does not have a hole like this.

3) Since I am making more than 1 box, I am cutting my paper in half.  I folded it in half (after making sure I would have enough for each box) then cut along the fold line.


4) When you put your edge at a corner vs the middle your project will appear seamless.  I find it is easier to fold my paper (or iron my fabric) under 1” then line it up to a corner.    
Hold the folded edge to your corner.
Wrap the remaining paper/fabric around your box.
Tape (glue if using fabric) the opposite end to your box.
Tape/glue the neatly folded edge on top at the corner. Tape the entire side of the box.


5) Bottom of box
Cut small triangle out of each corner.  This will make it less bulky underneath.

Fold up your first edge.  
Place one piece of tape in the middle of the paper to hold it to the box.
Go to the opposite side and do the same.
Then do the other two sides.
Once all four sides have been taped down, add a piece of tape at each corner.


 6) Top of box
Do the same as the bottom, except put tape/glue along the whole edge.

There you go, a free box to storage things in that looks nice.  I made four boxes and placed them on the top shelf in my daughter's room for out of season clothes.

Jan 10, 2011

Menu For The Week

This is our menu for the week.  Laura @ I'm an Organizing Junkie is the host of Meal Plan Monday.  Each week she posts what her menu is for the week.  At the end of her post hundreds of other bloggers post a link to their menu for that week also.  Ever wonder what to have for dinner?  Need new ideas or recipes?  Visit Orgjunkie each week for hundreds of ideas and recipes.  

Monday:
Lunch – Homemade chicken fingers w/ roasted potatoes (leftover from last night)
Dinner – Pizza sandwiches w/ salad
Tuesday: 
Lunch – Fish sticks w/ mixed veggies and pears
Dinner – Roasted Chicken (making 2) w/ roasted potatoes and corn (will make stock and use leftovers through week)
Wednesday: 
Lunch – Peanut butter sandwich w/ corn and pears
Dinner – Roast w/ potatoes and carrots
Thursday: 
Lunch – Cheesy chicken (leftovers from Tue.) and broccoli
Dinner – Chicken and waffles (leftovers from Tue.) w/ green beans
Friday: 
Lunch – Grilled cheese w/ carrots and dip
Dinner – Pork scallopini w/ buttered egg noodles and corn
Saturday: 
Breakfast – Waffles (will make batter Fri. night)
Lunch – (daughter) Chef Boyardee w/ salad; (son) fish sticks w/ salad
Dinner – Tombstone pizza 
Sunday: 
Breakfast – Waffles (batter already made up)
Lunch – (daughter) Tuna fish sandwich; (son) Peanut butter sandwich
Dinner – Tomato soup w/ grilled cheese sandwiches

  
(this weeks menu link)

Jan 9, 2011

New Year's Resolution To Get Organized

Laura from I'm an Organizing Junkie is an inspiration to me.  If you have never visited her site before then you are missing out.  Go visit her Here.  


She is doing a yearlong challenge to help us get better organized!  Instead of doing a month long challenge, she is breaking it down into 52 week long challenges.  Each Friday she will post a new challenge.  I’m not only looking forward to her posts but also all of the comments from her readers.  


While reading her post from January 6th (here) I followed her link to a previous post she had on brain dumping (here).  Her post on Making Lists and Batching Tasks aka Brain Dumping is a must read!!  I’ve always been one to make list, but lists like this…..

  • Wash laundry
  • Pick up living room
  • Clean kitchen
  • Change linens
  • Vaccum


Laura talks about breaking each task down.  List what needs to be done.  I broke down my “Pick up living room” task.  You can see my PDF for January 9th here.  Why haven’t I thought of this before!!  Seeing all of the little things written down in my notebook makes it feel like it is easier to do.  I can take an easier task and assign it to one of the kids.  My kids don’t do much of anything around the house.  One is 3 and the other will be 7 in May.  I want to start them off slowly so there isn’t too much a fight J  I want to raise them to be good adults not someone that expects someone to do everything for them.  

Jan 5, 2011

Mending Clothes

If your family is anything like mine, the next few tutorials will be used often.  They are about mending clothes.  My DH always seems to rip his jeans at the back pockets.  I have been mending them to his satisfaction, but not to mine.  This tutorial is so easy to follow and the end result it perfect!  You can find the tutorials here for the back pockets and here for patching knees.


Table Runner

Diary of a quilter has some great tutorials on quilting.  Choosing fabric, how to work with quilting patterns, rotary cutting, borders, batting and different binding methods are just a few of the tutorial you will find HERE at Diary of a quilter.


HERE you will find the tutorial for this super easy table runner.

Jan 4, 2011

Toy Storage Solutions!

www.infarrantlycreative.net has a tutorial for organizing toys!  She has even made a few games to play with the cards.
musicalinstruments


IMG_1933


IMG_1952
Related Posts Plugin for WordPress, Blogger...