Feb 27, 2011

Menu For The Week

This week should be much quieter than last week.  We (PSA) hosted a book fair at my daughter's school last week.  Little man and I did a whole lot of running back and forth everyday opening and closing the book fair.


Here is what we are having for dinner this week.  What are you having yummy?


Monday:
Pancakes (little man's favorite meal)


Tuesday:
Steak Sandwiches
Sweet Potato Skins (saving the inside for later in the week)


Wednesday:
Spaghetti
Garlic Bread


Thursday:
Balsamic Glazed Chicken
Green Beans

Friday:
Beef Stroganoff

Saturday:
Baked Pork Chops
Sweet Potato Casserole (using leftovers from Tuesday's dinner)

Sunday:
Taco Salad


I am hoping to finish a few project I've already started!  (keeping fingers crossed)


1) Table Runner
2) Refurbished Spice Rack
3) Transform a Folding Metal Bed Tray into a Magnetic
    Message Board


Wish me luck :-)
Linking up to....


Feb 23, 2011

Anyone you know having a baby?

For Christmas this year I gave sets of greeting cards to use throughout the year.  Here is the baby card I included in the set.


I enjoy making graphics with Photoshop.  Most of the time I take a picture of an object and alter it.  I took a few pictures of my son's pacifiers before throwing them away (since he finally doesn't use them anymore).  


I digitally changed the color of the pacifier from blue to green so this card could be given to anyone expecting a baby, not just for someone expecting a boy.  This is very easy to do.  If you are interested in a tutorial on how to do this, I can put one together :-)  Leave me a request in the comments.


When I see a layout I like I do a sketch of it in my notebook.  I also create a digital sketch as well using Photoshop CS2.  I've included my layout sketch for this baby card.  You can click on the image to open a larger image.  Then just right click on the photo to save it to your computer.  I've also posted the pacifier image as well.  Just click on it to open up a full resolution photo, then save it to your computer.


You have my permission to use this image on a card which you give someone as a gift.  You may not use this image to make money, or as a freebie.  You may post a link back to this post for other people to stop by and collect the freebie for themselves.


I am planning on posting more of my card creations, including the digital stamps so you can make your own cards!!  


To make a mat for anything on a card, cut the mat 1/4" larger.  
Example: You want to mat a paper that is cut 2 1/2" wide by 1" high.  Your mat will be 2 3/4" wide by 1 1/4" high.
This will give you a 1/8" mat on each side.  You can see the mat I used under the pacifier in the picture above.

Feb 16, 2011

Fabric Or Chocolate, I Pick Fabric!

If I had to pick between fabric and chocolate, I would most defiantly pick FABRIC!!  The beautiful colors, the endless projects that could be made out of it.  The one thing I wish I had more of?  Fabric stores close by that sell designer fabrics.  


Online shopping is an option, but most store make you buy fabric by the yard.  At $8-$10 per yard, that can really take a bite out of your wallet.  For big projects it's okay because you normally would buy a large amount anyway, but what if you are a quilter or want to make a small project?  


I found a AWESOME store online that not only sells wonderful designer fabrics at a great price, but they will sell you fabric starting at 1/8 of a yard!!!.  It's like a dream come true :-D


Hawthorne Threads Logo Image


Hawthorne Threads not only will sell you 1/8 yard but they also have great prices on their fabrics and their shipping prices rock.  You must check them out!!

Feb 13, 2011

This Weekend

Saturday afternoon my dear 6 year old and I ventured to our local fabric store, Verna's Fabrics in Mifflinburg, PA.  As soon as we walked through the door the owner started talking to my daughter.  She asked if she starting sewing yet then took a few 6" squares out of a bag full of scraps to show her.  She showed my daughter how we could cut the squares into smaller squares so she could make a quilt or pillow for her baby dolls.  My daughter had a smile on her face from ear to ear.  She then proceeded to give her the whole bag of fabrics!  
Verna, thank you so much for giving my daughter the inspiration to start sewing.!!  Your generosity was such pleasant surprise.  You are a wonderful woman.


This morning we went through all of the fabrics.  I asked her what she wanted to make first.  Her answer?  A quilt for one of her baby dolls.  She picked out the fabrics and I cut them into 2 1/2" squares.  She has hand sewn one row together so far.  I told her to take her time and work on it here and there.  I'll post her progress as she sews her first project, a baby doll quilt!  I'm such a proud mama!!
The reason for our trip to Verna's on Saturday was to buy fabric for a table runner I want to make for our dinning room table.  This is what we came home with.
Most of them are Moda Fabrics, which is one of my favorite fabric companies.  I am going to use this tutorial for my table runner.  This piece of Moda will be used for the backing. 

____________________________________________
Valentine's day is just around the corner.  Tonight we printed, cut, and addressed these cute little valentine's for my daughter's 1st grade class.
The kids put 20 heart candies in snack bags while I stapled them to the envelopes.  I think they ate 1 for every 3 they put in the bags :-)

Menu For The Week

What's for dinner this week?  Steak on Valentine's Day, since hubby loves steak!  The kids are excited about making individual personalized pizzas this Friday.  And Sunday we are having a big chicken dinner.


Our menu this week.....


~ Linking up to ~ 


Feb 11, 2011

Homemade Laundry Soap

Making laundry soap is something I've wanted to do for quite some time.  It is economical and produces less consumer waste.  No more buying big plastic containers of laundry detergent anymore!  My 3 year old had fun helping me mix up the soap.   I tested the soap in cold water.  Keeping my fingers crossed, just in case, I pulled each piece of clothing out of the washer for inspection.  The results were spectacular!  I’m sure you are thinking there is no way this is better than store bought detergent.  I thought this also when I first read about it.  The more I read about using homemade laundry soap on blogs and reading all of the comments others had on this subject made me wonder if it would be comparable to mine.  I am happy to say it is!  My clothes all came out perfectly clean.  Want to make your own?  Here is how.

~ Supplies ~
1 Bar of soap (I used Fels Naptha Soap, but you could use Ivory)
1 Cup of Arm & Hammer Super Washing Soda
1 Cup of Borax
Grater
Food processor (optional)
Container to storage soap in


Grate the bar of soap.  If you are not planning on using a food processor to mix this all together then grate the soap as fine as you can.  Be careful, don't cut any fingers.


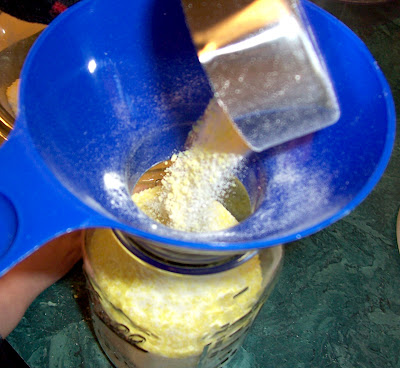
Add the grated soap, 1 cup of washing soda and 1 cup borax to your food processor. 


The soap will not get as fine as the washing soda or borax.  That's okay.  It should look something like this.


Put your soap in a container that will seal tight.  I put mine in a quart mason jar.  Well, my son did it for me :-)

That's it.  Super easy to make!  Use 1-2 tablespoons per load.  I am always washing full loads, so I use 2T. Sprinkle the soap into the water as it is filling up, then put in your clothes.


Let me know if you make it.  I would love to know :-)
P.S - Another laundry tip, which I've been using for a few years now, use white vinegar as a fabric softener.  I noticed a few years ago that my clothes were always making me a bit itchy so I stopped using fabric softener and started using vinegar.  The vinegar does a fantastic job breaking down any remaining soap during the rinse cycle.  I believe that is what was causing my itchiness, soap residue on my clothes.  And no your clothes will not smell like vinegar.  Vinegar is a natural deodorizer and disinfectant.  I have been using vinegar to clean for years.

Feb 6, 2011

Tutorial For Storage Box From Soda Case

Have you ever been in need of storage, but didn’t have the extra money at that moment to run out and buy something?  This project will most likely cost you nothing, like it did me!

Supplies needed
Empty case of soda
Wrapping paper or fabric
Invisible tape or glue (if using fabric)
Scissors

1) Cut the top off of your box.
      
 2) Lay your box on top of your paper/fabric to determine where to cut. 


Make sure the length will wrap all the way around the box plus an extra 1”. 
Add enough paper/fabric for 1-2” on the bottom.
Add about 6” to fold over the top.  Less if your box does not have a hole like this.

3) Since I am making more than 1 box, I am cutting my paper in half.  I folded it in half (after making sure I would have enough for each box) then cut along the fold line.


4) When you put your edge at a corner vs the middle your project will appear seamless.  I find it is easier to fold my paper (or iron my fabric) under 1” then line it up to a corner.    
Hold the folded edge to your corner.
Wrap the remaining paper/fabric around your box.
Tape (glue if using fabric) the opposite end to your box.
Tape/glue the neatly folded edge on top at the corner. Tape the entire side of the box.


5) Bottom of box
Cut small triangle out of each corner.  This will make it less bulky underneath.

Fold up your first edge.  
Place one piece of tape in the middle of the paper to hold it to the box.
Go to the opposite side and do the same.
Then do the other two sides.
Once all four sides have been taped down, add a piece of tape at each corner.


 6) Top of box
Do the same as the bottom, except put tape/glue along the whole edge.

There you go, a free box to storage things in that looks nice.  I made four boxes and placed them on the top shelf in my daughter's room for out of season clothes.
Related Posts Plugin for WordPress, Blogger...